This article explains how to set up Brett Terpstra’s Slogger with a new plugin to journal your daily Google Analytics site stats. This plugin supports:
- Multiple web properties as long as they are under the same Google login.
- Multiple dates so you can skip a few Slogger run days and catch up (or back fill).
- Only logs a full day’s worth of stats, so if it runs now, it logs up to yesterday’s stats.
- Captures page views, visitors, top 5 sources and top 10 popular pages. If you want different stats, let me know in the comments or via App.net @hiltmon or Twitter @hiltmon.
Warning: This plugin is alpha code, so assume the usual no warranty legalize, basically proceed at your own peril.
Note also that this plugin is only two days old as this gets posted, whereas the access token lasts 2 weeks, so the OAuth 2.0 renewal code has not yet been tested.
Finally, I tend to try to make installation instructions as explicit as possible, so please bear with me as there are quite a few steps here.
Installing the Plugin
Follow these to install and configure the plugin. If any steps are unclear, check out the detailed instructions below.
Quick Install Instructions
- Install the
google-api-clientgem - Save Gist 4072068 as
plugins/googleanalyticsclient.rb - Patch
sloggerusing Gist 4072079 - Run
/slogger -o Googleto create theslogger_configentry - Add your web properties UA codes and paste in the client_id and secret
  client_id: "237632137636.apps.googleusercontent.com"
  client_secret: "xUgp_NqKHnyJ_b8cwZbR1tnX"
- Run
/slogger -o Googleagain to launch a browser, authenticate and provide anauth_code. Paste that intoslogger_configunderauth_code. - Run
/slogger -o Googlea third time to get anaccess_tokenand create the first entries
Detailed Installation Instructions
If you are here, I assume you already have Slogger installed and running. As of writing this, I am on version 2.14.2.
Open a terminal and cd to your slogger folder (in my case that’s in ~/Scripts/Slogger. Run all commands from there.
Install the Google API Gem
In terminal, if you use RVM:
gem install google-api-client
If you are running the system ruby, you need to sudo it instead. You can tell if you are running the system ruby by running which ruby and if the answer is /usr/bin/ruby, it’s the system one.
sudo gem install google-api-client
Either way, you should see:
Installing ri documentation for google-api-client-0.5.0...
Installing RDoc documentation for google-api-client-0.5.0...
Note that this is a pre-release gem, but it’s close to final.
Install the Plugin
Download and extract the googleanalyticslogger.rb plugin file from Gist 4072068. Then move the googleanalyticslogger.rb file to your Slogger plugins folder.
Or you can also just create a new googleanalyticslogger.rb in your plugins folder and paste the raw gist code in.
Patch Slogger
Note: This is critical, the plugin will not work without this patch.
Open slogger in your favorite programmer’s editor and go to line 172, you should see:
eval(plugin['class']).new.do_log
Replace it with:
if plugin['updates_config'] == true
  # Pass a reference to config for mutation
  eval(plugin['class']).new.do_log(@config)
else
  # Usual thing (so that we don't break other plugins)
  eval(plugin['class']).new.do_log
end
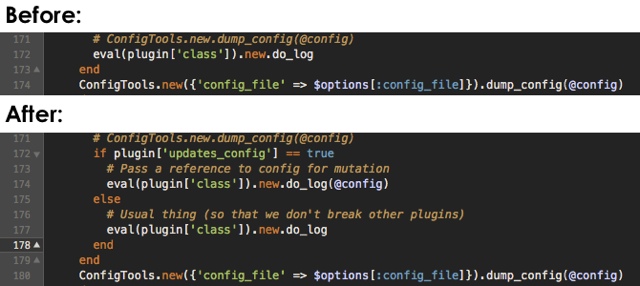
An explanation for this patch is in the “How it Works” section below.
Save and close slogger
Optionally: Create your own Google API Client keys
You may skip this step in the process and use the Google API Client codes that I already set up. I’ve not been able to test this on anything but my own account so please let me know if this works.
Just in case, I have included instructions on how to create your own as an appendix to this post.
Create the slogger_config file entry for this plugin
As for all plugins, the first thing you need to do is run Slogger to create the slogger_config for it. The -o Google parameter forces Slogger to only run this plugin (and not run all your other plugins and create duplicate Day One entries):
./slogger -o Google
You should see:
Initializing Slogger v2.0 (2.0.14.2)...
> 11:00:45 GoogleAnalyticsLogger: Google Analytics has not been configured or a feed is invalid, please edit your slogger_config file.
Add the Client ID and Secret
Open slogger_config in your favorite text editor and scroll down to the GoogleAnalyticsLogger section.
Paste in my client ID and secret key (or use your own)
  client_id: "237632137636.apps.googleusercontent.com"
  client_secret: "xUgp_NqKHnyJ_b8cwZbR1tnX"
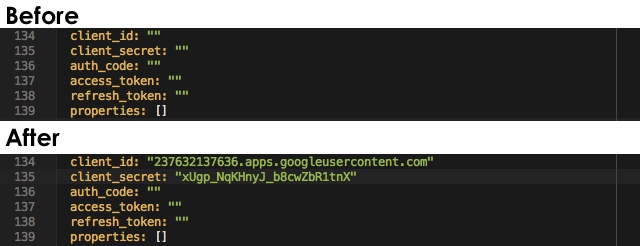
Make sure you save and close slogger_config before moving on to the next step.
Acquire the Authentication Code
This is the painful part of OAuth 2.0, you need to authorize this application to access your data. To do so, just run Slogger again.
./slogger -o Google
Slogger will open your default browser and request authorization to access your data.
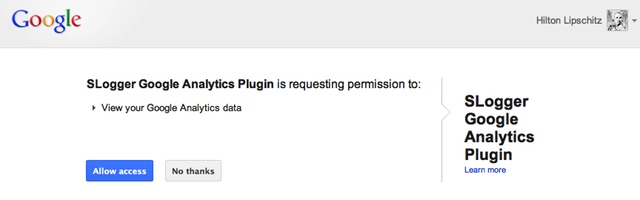
Click Allow Access. It will come back with an one-time Authorization Code.

Copy the code and paste it into your slogger_config in the auth_code field.

Save and close the file again.
Acquire the Access Token
Once more, run
./slogger -o Google
And you should see (Look for “Getting access token”)
Initializing Slogger v2.0 (2.0.14.2)...
  11:13:34 GoogleAnalyticsLogger: Logging Google Analytics posts
  11:13:34 GoogleAnalyticsLogger: Run for 2012-11-13 - 2012-11-13
  11:13:34 GoogleAnalyticsLogger: Getting access Token...
If you look in your slogger_config now, you should now see an access_token and a refresh_token.

If you do not, check that the slogger patch has been saved, set the auth_code to "" and try again.
Add web properties
To add web properties, go to your Google Analytics home page and sign in.
Click on “All Accounts” at the top-left, then expand the first account.
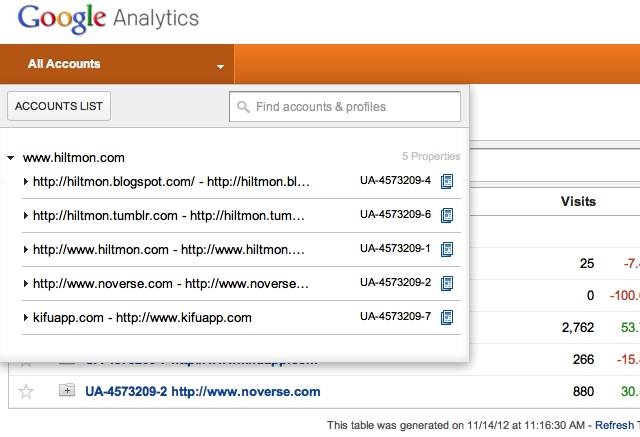
Add the UA codes for each property you want to log to the properties list in slogger_config. These are the same codes you use in your site to send stats to Google Analytics.

Test that it works
One more time, dear friends:
./slogger -o Google
And you should see (Note that I ran this on the 14th for two of my properties)
Initializing Slogger v2.0 (2.0.14.2)...
11:20:09 GoogleAnalyticsLogger: Logging Google Analytics posts
11:20:09 GoogleAnalyticsLogger: Run for 2012-11-13 - 2012-11-13
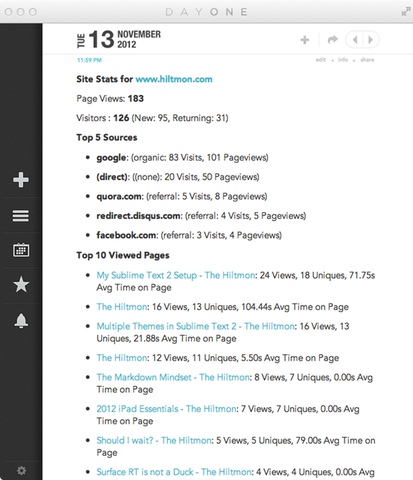
11:20:10 GoogleAnalyticsLogger: - Getting Site Stats for www.hiltmon.com...
11:20:11 DayOne: =====[ Saving entry to entries/2B435D2409FA4A729A3DC4C4D4734E07 ]
11:20:11 GoogleAnalyticsLogger: - Getting Site Stats for www.noverse.com...
11:20:12 DayOne: =====[ Saving entry to entries/6A30ED73AFD9454197818B1E87C28B10 ]
And in DayOne:
To undo the test, just run
./slogger -o Google -u 1
And you’re done
This plugin should now run every time your scheduled Slogger run occurs.
How it works
This plugin uses the Google Analytics API to retrieve stats for web properties using OAuth 2.0 security.
Oauth 2.0: Google Style
The first thing you need to do is create a Google API Client registration at Google (See the Appendix below on how to do this). The most important thing is to tell Google that this is an Installed Application. That way, Google will generate a refresh_token that can be used to enable the application to refresh its own access when the regular access_token expires.
Even though its an installed application, the first time around, Google OAuth 2.0 requires a user sitting in front of a browser. So I setup the plugin to help with this process.
If the client_id is not set, the plugin assumes this is the first run, pops a warning and does nothing.
If the client_id is set, it checks the auth_code. If the auth_code is not set, this must be the second run. The plugin creates an OAuth 2.0 authentication URL and launches the user’s browser. The URL is configured such that the resulting auth_code is visible to the user and can be copied and pasted. At some point, I could possibly write code to monitor the browser and get the auth_code but thats too much for now.
Note that the auth_code is a single use code, once it has been used once, it’s useless. We need to convert that to a longer term token. So, if the client_id is set and there is an auth_code, check the access_token. If that is blank, get a new one. Since this is assumed to be the first time, we know that Google also returns the refresh_token. These are saved to the config file (see mutable config below).
It then checks the access_token to see if it has expired. If so, asks for a new one. This code has not yet been tested, and will probably fail. Two days only!
Mutable Config
The default Slogger plugin gets a ruby class level copy of the main Slogger config data structure. The problem is, I needed to able to save the access_token and refresh_token as and when they change without user involvement. If you change the copy, it does not change the original, and when Slogger finishes its run and saves the updated config, these changes will be lost.
I did look at creating a client_secrets.json file as per the gem documentation, but I feel that having more than one configuration file for Slogger was not a good idea.
So instead, I needed access to the original config data structure, not the class copy. Hence the patch. Now, slogger looks for an updated_config attribute in the registration, and if it is true, passes the config to the plugin directly, else runs all other plugins as usual. This plugin sets 'updates_config' => true in its registration.
I’m uncertain whether this is a good or right way to go, but it works for now in the alpha. Note that any updates to Slogger will trash this patch, which means a two-file approach may be better.
API Discovery
Once the OAuth 2.0 is done, the plugin “discovers” the Google Analytics API. This is needed to access it.
Property Caching
The plugin then uses the Analytics Management API to download and cache a set of all the web properties accessible to this account. If anything went wrong in OAuth 2.0, we’ll find it out here.
Dates
The Google Analytics API does not seem to make timestamps available. It does need a start_date and end_date to get data. If you just use these, though, the API sums all the data between the two dates and returns it as one row. Fortunately, it does have a date dimension that can be used.
Since I want the journal in Day One to have the full set of stats for a date, I setup the plugin to operate up until yesterday, and to do nothing if the last run was after yesterday. That way, you should never see a journal with partial day stats. But you can back fill if you want.
Properties
The plugin then runs for each web site that you have a Google Analytics UA code. It uses the cached properties list to convert that into an internal Google site code and get the site name (used in the journal header). If it cannot match the UA code to an entry in the cache, it does nothing.
The Process
For each matched site code, it runs the queries. In the alpha, I have these nice and separate for testing, but they can be batched later on.
Since the date is a dimension field, it means that the Google Analytics API returns a row for each date and each other dimension. For example, in visitors, it returns a row for new visitors and another row for returning visitors for the same date. Which means that I need to take the data returned and consolidate the data by date.
I created a content hash that is date keyed, and add an array of markdown formatted strings to each date in order that I’d like the journal to appear. It’s simple, and it works.
Once all the API queries are done, I loop through the content dates, grab each array of strings, concatenate them into a body and use Slogger to create a new Day One entry for that date as of 11:59PM.
Feel free to look at the code and let me know what you think. I try to make my early code more explicit to aid debugging, and plan to return later to optimize and idiomize the code.
Appendix: Optionally create your own Google API Client keys
So just in case, here’s how to create your own Google API client keys:
- Go to the Google API Console and login with the account that you use for Analytics.
- Create a New API Application
- Enable access to the Google Analytics API, and agree to the EULA if necessary.
- Click on API Access to create you OAuth2 keys
- Click on Create an OAuth 2.0 Client ID
- Give it a name and click next
- Choose Installed Application. This is critical or the keys will not work.
- Click Create Client ID
You should now see a Client ID and Secret for Installed Applications. Copy and paste these into your slogger_config.
As always, feel free to comment below on this post, or follow me on App.Net as @hiltmon or Twitter as @hiltmon.
Enjoy.