One thing I like to do is to have different themes for different file types in my text editor. That way, at a glance, I can guess what kind of file a text-filled window contains, especially when zoomed out using Mission Control. I’ve been using Custom Language Preferences in BBEdit preferences to set up the color scheme for each file type there, and I have set up Multiple Themes in Sublime Text 2 previously.
But how to do this in TextMate 2?
Turns out, not so easy yet. But I have it working now:
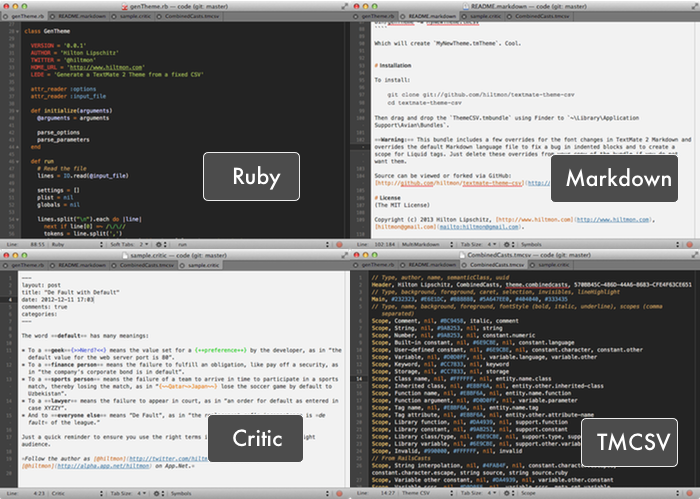
Since TextMate 2 does not yet support multiple themes by file type, you can still create a single theme that has multiple presentations using TextMate 2’s brilliant scope selectors. In my case, I use a variant of Ryan Bates’ lovely RailsCasts theme for coding and a modified light theme for Markdown and text files.
You can download my CombinedCasts.tmTheme here. Double-click to install.
But creating a theme for TextMate 2 (or Sublime Text 2) is hard. You see, the theme file is actually a .plist file which is a large and complex XML file. I don’t know about you, but I find them hard to navigate and edit.
So I got my geek on today and created https://github.com/hiltmon/textmate-theme-csv, a TextMate 2 bundle and some scripts to enable me to use a simple CSV file format to create and iterate on a theme from within TextMate 2. With the included ThemeCSV bundle installed in your version of TextMate 2, you can easily create and iterate over theme design. Then again, I suspect I’m the only one who will ever use this.
After installing the bundle, get started by creating a .tmcsv file in TextMate (or start with the provided BlankTheme.tmcsv), and start editing. A tmcsv file looks something like this:
// Type, author, name, semanticClass, uuid
Header, Hilton Lipschitz, CombinedCasts, theme.combinedcasts, 570BB45C-486D-44A6-8683-CFE4F63CE651
// Type, background, foreground, caret, selection, invisibles, lineHighlight
Main, #232323, #E6E1DC, #888888, #5A647EE0, #404040, #333435
// Type, name, background, foreground, fontStyle (bold, italic, underline), scopes (comma separated)
Scope, Comment, nil, #BC9458, italic, comment
Scope, String, nil, #9AB253, nil, string
Scope, Number, nil, #9AB253, nil, constant.numeric
Scope, Built-in constant, nil, #6E9CBE, nil, constant.language
Scope, User-defined constant, nil, #6E9CBE, nil, constant.character, constant.other
Scope, Variable, nil, #D0D0FF, nil, variable.language, variable.other
...
It is a simple, fixed format CSV-like file that has only three line types, a Header line that establishes the bundle, a Main line that sets the default colors and Scope lines where you can change the color based on TextMate 2’s comprehensive scoping rules (see Scope Selectors in the TextMate manual). Oh, and you can comment out lines too.
Hit ⌘R to generate the TextMate theme. The first time it runs, the bundle creates a new bundle for the theme and generates the theme file. You need to then select your new theme from the View / Themes menu. After that, make changes to the tmcsv file, hit ⌘R to generate, and flip tabs to see the new theme in action as it evolves.
I have also included scripts to generate stand-alone tmTheme files from tmcsv files as well as a script to parse existing themes into this simple format to help you get ideas for scopes to use. See the README file at https://github.com/hiltmon/textmate-theme-csv for more details on installation and usage.
Note: This approach is a workaround. Allan Odgaard has confirmed that they are going to refactor TextMate 2 to enable people to set different themes in .tm_properties files for different file types. Until then, the multi-scope hack still works.
This is at best beta level software and has been tested and run on one and only one machine (mine) with the current alpha version of TextMate 2! You takes your chances by installing and using it.
Enjoy.
Follow the author as @hiltmon on Twitter or @hiltmon on App.Net.